> ## Documentation Index
> Fetch the complete documentation index at: https://docs.fonoster.com/llms.txt
> Use this file to discover all available pages before exploring further.
# Quickstart
> Learn how to get started with Fonoster.
Most of Fonoster's use cases require an account, the Command-line interface, and a virtual phone number. This guide will walk you through the steps to start with Fonoster quickly.
To get started, you'll need a Fonoster account. Sign up at [https://app.fonoster.com/auth/signup](https://app.fonoster.com/auth/signup)
Voice applications in Fonoster require Node.js to run. If you don't have Node.js installed, you can download it from the
official website
. Once you have Node.js installed, you can create a simple voice application by running the following commands:
```bash theme={"system"}
mkdir voice-app
cd voice-app
npm init -y
npm install @fonoster/voice
```
Create a new script and add the following code:
```javascript index.js theme={"system"}
const VoiceServer = require("@fonoster/voice").default;
new VoiceServer().listen(async (req, voice) => {
await voice.answer();
await voice.say("Hello from Fonoster!");
await voice.hangup();
});
```
Finally, run the application with the following command:
```bash theme={"system"}
node index.js
```
Keep the application running for the next steps.
To make your application available to the public, you must expose it to the internet. One way to do this is by using a service like
ngrok
. You can install ngrok by running the following command:
```bash theme={"system"}
npm install -g ngrok
```
Once you have ngrok installed, you can expose your application by running the following command:
```bash theme={"system"}
ngrok tcp 50061
```
Your output should look like this:
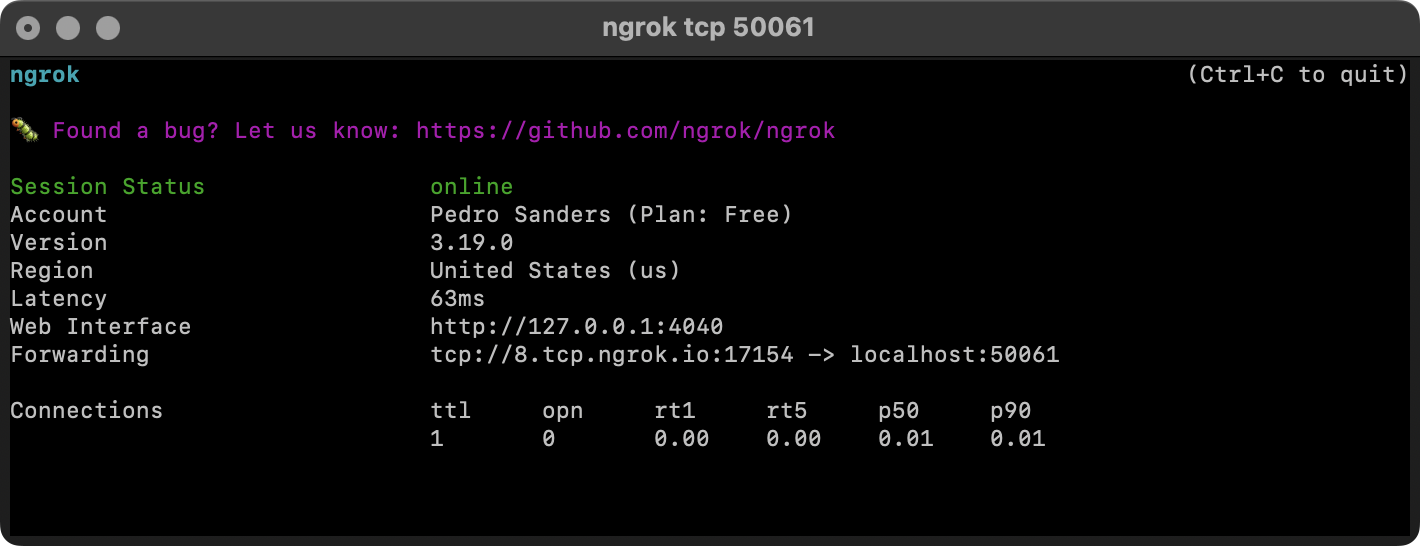 This will give you a public endpoint that you can use to access your application.
Follow the next steps to link a virtual phone number to your application:
Fonoster CTL is a command-line tool that allows you to manage your Fonoster resources. You can create, update, and delete Fonoster resources like phone numbers, SIP trunks, etc.
You can install the tool using the following command:
```bash theme={"system"}
npm install -g @fonoster/ctl
```
Check that the installation was successful by running the following command:
```bash theme={"system"}
fonoster --version
```
If the installation was successful, you should see the version number of the command-line tool.
Before using the command-line tool, log in to a Workspace. You can do this by running the following command:
```bash theme={"system"}
fonoster workspaces:login
```
This command will prompt you to enter your *AccessKeyId* and *AccessKeySecret*. Once you have entered this information, you will be logged in to your Workspace.
To create a new Application, you can use the following command:
```bash theme={"system"}
fonoster applications:create
```
You will be asked to enter the Application's name, speech information, and other details. Once you have entered this information, the Application will be created.
Your output should look like this:
This will give you a public endpoint that you can use to access your application.
Follow the next steps to link a virtual phone number to your application:
Fonoster CTL is a command-line tool that allows you to manage your Fonoster resources. You can create, update, and delete Fonoster resources like phone numbers, SIP trunks, etc.
You can install the tool using the following command:
```bash theme={"system"}
npm install -g @fonoster/ctl
```
Check that the installation was successful by running the following command:
```bash theme={"system"}
fonoster --version
```
If the installation was successful, you should see the version number of the command-line tool.
Before using the command-line tool, log in to a Workspace. You can do this by running the following command:
```bash theme={"system"}
fonoster workspaces:login
```
This command will prompt you to enter your *AccessKeyId* and *AccessKeySecret*. Once you have entered this information, you will be logged in to your Workspace.
To create a new Application, you can use the following command:
```bash theme={"system"}
fonoster applications:create
```
You will be asked to enter the Application's name, speech information, and other details. Once you have entered this information, the Application will be created.
Your output should look like this:
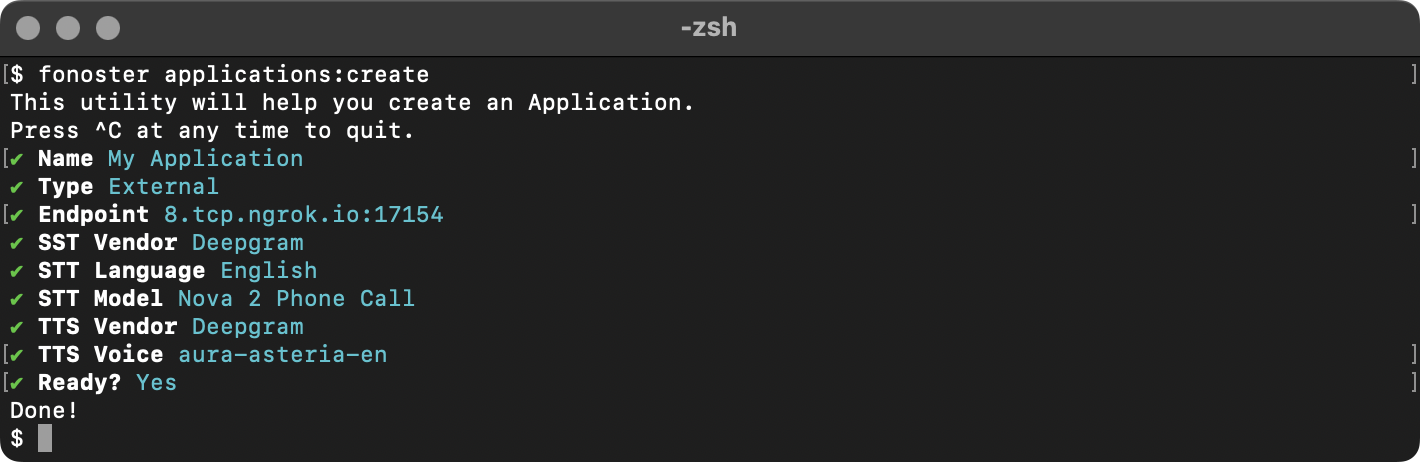 To can list your existing applications with the following command:
```bash theme={"system"}
fonoster applications:list
```
To link a Twilio phone number to your application, you can use the following command:
```bash theme={"system"}
fonoster sipnet:numbers:linkTwilioNumber
```
You will be asked to enter an existing virtual phone number, the *Twilio SID*, and the *Twilio Auth Token*. Once you have entered this information, the Twilio phone number will be linked to your application.
To confirm that the phone number was linked successfully, you can run the following command:
```bash theme={"system"}
fonoster sipnet:numbers:list
```
You can now call the Twilio phone number to access your voice application.
Twilio is used as an example. You can use other SIP providers as well.
You can use the command-line tool or the SDK to make an outbound call. To make an outbound call, first, you need the reference of the application you created. You can get the reference by running the following command:
```bash theme={"system"}
fonoster applications:list
```
Once you have the reference, you can use the `fonoster sipnet:calls:create` command to make an outbound call. Here is an example:
```bash theme={"system"}
fonoster sipnet:calls:create --app-ref 4b01c9b1-8cb1-48fb-bd49-f3daf13463a9 \
--from +18456134823 \
--to +17853134923
```
You can also use the SDK to make an outbound call. To do this, you can use the following code:
```javascript call.js theme={"system"}
const SDK = require("@fonoster/sdk");
# Replace with your Workspace Access Key Id
const client = SDK.Client({ accessKeyId: "00000000-0000-0000-0000-000000000000" });
client.loginWithApiKey("AP0eerv2g7qow3e950k7twu4rvydcunq3k", "fNc...")
.then(async() => {
const calls = new SDK.Calls(client);
const response = await calls.createCall({
from: "+18456134823",
to: "+17853134923",
appRef: "4b01c9b1-8cb1-48fb-bd49-f3daf13463a9"
})
console.log(response);
});
```
Replace the example values with the appropriate ones.
Now that you have created your first Application learn more about Fonoster's advanced features and concepts.
Learn more about the Programmable Voice API and how to build advanced voice applications.
Learn how to use the Node.js and Web SDKs to interact with Fonoster programmatically.
To can list your existing applications with the following command:
```bash theme={"system"}
fonoster applications:list
```
To link a Twilio phone number to your application, you can use the following command:
```bash theme={"system"}
fonoster sipnet:numbers:linkTwilioNumber
```
You will be asked to enter an existing virtual phone number, the *Twilio SID*, and the *Twilio Auth Token*. Once you have entered this information, the Twilio phone number will be linked to your application.
To confirm that the phone number was linked successfully, you can run the following command:
```bash theme={"system"}
fonoster sipnet:numbers:list
```
You can now call the Twilio phone number to access your voice application.
Twilio is used as an example. You can use other SIP providers as well.
You can use the command-line tool or the SDK to make an outbound call. To make an outbound call, first, you need the reference of the application you created. You can get the reference by running the following command:
```bash theme={"system"}
fonoster applications:list
```
Once you have the reference, you can use the `fonoster sipnet:calls:create` command to make an outbound call. Here is an example:
```bash theme={"system"}
fonoster sipnet:calls:create --app-ref 4b01c9b1-8cb1-48fb-bd49-f3daf13463a9 \
--from +18456134823 \
--to +17853134923
```
You can also use the SDK to make an outbound call. To do this, you can use the following code:
```javascript call.js theme={"system"}
const SDK = require("@fonoster/sdk");
# Replace with your Workspace Access Key Id
const client = SDK.Client({ accessKeyId: "00000000-0000-0000-0000-000000000000" });
client.loginWithApiKey("AP0eerv2g7qow3e950k7twu4rvydcunq3k", "fNc...")
.then(async() => {
const calls = new SDK.Calls(client);
const response = await calls.createCall({
from: "+18456134823",
to: "+17853134923",
appRef: "4b01c9b1-8cb1-48fb-bd49-f3daf13463a9"
})
console.log(response);
});
```
Replace the example values with the appropriate ones.
Now that you have created your first Application learn more about Fonoster's advanced features and concepts.
Learn more about the Programmable Voice API and how to build advanced voice applications.
Learn how to use the Node.js and Web SDKs to interact with Fonoster programmatically.